From framework selection to deployment — in this blog I walk you through the complete process of building my portfolio website nickzomer.com. Including my research into React, Vue.js and Angular, the technical setup, SEO strategy and the lessons I learned along the way.
Every developer needs a place to showcase their work. A GitHub profile is nice, a LinkedIn page is useful, but nothing is as powerful as your own website. In this blog post, I’ll walk you through the entire process: from choosing the right technology to launching nickzomer.com.
Why a portfolio website?
As a Computer Science student at Hogeschool Leiden and founder of Zomer Development, I wanted more than just a CV. I wanted a place where potential clients and employers could immediately see what I’m capable of. A portfolio website gives you full control over how you present yourself — no platform limitations, no distractions from other people’s content.
My goals were clear: professionally showcase my projects and skills, start a blog to share knowledge, become visible to potential clients and employers, and demonstrate that I can actually build websites.
Choosing the framework: React, Vue.js or Angular?
This was perhaps the most important decision of the entire project. For my KECOEX module at Hogeschool Leiden, I had to build an application using a framework, so I decided to do serious research on this.
The candidates
I examined three frameworks:
React — Developed by Meta, the most widely used frontend framework in the world. Known for its component-based architecture and massive ecosystem.
Vue.js — Created by Evan You, loved for its simplicity and low barrier to entry. Combines the best of React and Angular.
Angular — Google’s complete framework with everything built in. Powerful, but complex.
My research
I conducted desk research and compared the frameworks on functionality, performance, learning curve, development time and job market relevance.
Functionality: React offers maximum flexibility through its modular approach. You choose your own routing (React Router), state management (Redux, Zustand) and styling. Vue.js has more out-of-the-box, and Angular has literally everything built in.
Performance: React and Vue.js score similarly on speed and bundle size. Angular is heavier due to the complete framework that ships with it.
Learning curve: Vue.js has the lowest barrier to entry. React sits in the middle and Angular has the steepest learning curve.
Job market: React dominates the job market. Most companies in the Netherlands and worldwide are looking for React developers.
The choice: React
Ultimately, I chose React. The main reasons:
Job market relevance — React is by far the most in-demand. As a student, you want to invest in skills that advance your career. The ecosystem of libraries, tools and community support is unmatched. The flexibility allowed me to choose exactly which tools I wanted. And should the website grow, React scales effortlessly.
The technical setup
Tech stack
After choosing React, I assembled the following stack: React as the frontend framework, React Router for page navigation, CSS for styling, Netlify for hosting and deployment, and Git & GitHub for version control.
Project structure
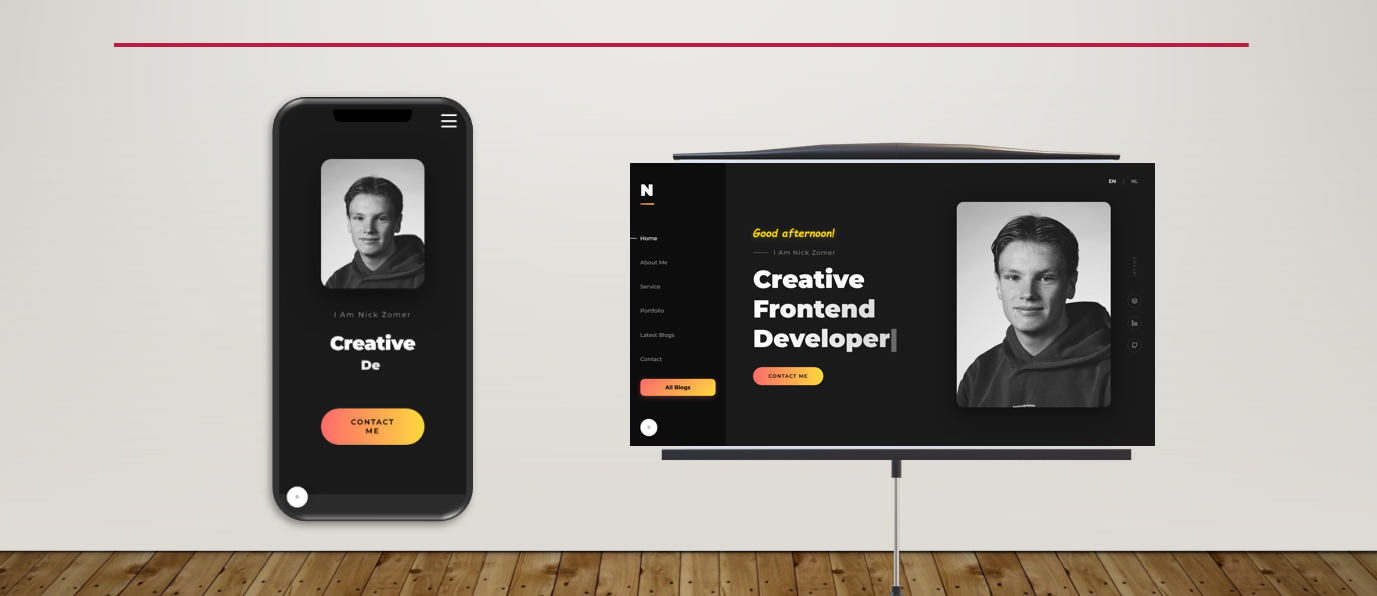
I built the website as a single-page application (SPA) with multiple routes: Home (the landing page), About (my story and timeline), Services (what I offer), Portfolio (my projects), Blog (articles and knowledge sharing) and Contact (ways to reach me).
Multilingual support
A deliberate choice was to make the website bilingual: Dutch and English. This expands my reach and shows that I can work internationally. I built a language switching system where the entire interface toggles between NL and EN.
The design
Design principles
My design philosophy was simple: colourful, modern and professional. I wanted the website to stand out and radiate personality.
The key design choices: a colourful and eye-catching palette with purple/blue gradients, vibrant accents and floating decorative elements. Clear typography with Space Grotesk as the main font. Card-based layouts for clear presentation of projects and services with soft shadows. Responsive design that works well on any device. And dynamic animations with hover effects, scroll animations and gradient transitions that bring the experience to life.
Responsive design
Honestly, I didn’t work mobile-first — I started with the desktop design and then made the website responsive for smaller screens. In hindsight, mobile-first would probably have saved me time. Adapting a desktop layout to mobile requires more CSS overrides than the other way around. This is definitely something I’d do differently in my next project.
Hosting and deployment
Why Netlify?
For hosting, I chose Netlify, and for good reasons: a free tier that’s perfect for a portfolio website, Git integration where every push to GitHub automatically triggers a new deploy, a fast CDN so the website loads quickly anywhere in the world, easy custom domain connection, and an SSL certificate included by default.
The domain
The domain nickzomer.com was a deliberate choice. Your own name as a domain is powerful for personal branding. It makes you easy to find and professional. I also worked on DNS configuration for subdomains, such as blog.nickzomer.com for a separate blog environment.
SEO: Being found
A beautiful website is worthless if nobody finds it. I invested heavily in search engine optimisation.
Technical SEO
Each page has unique title tags and meta descriptions. I added JSON-LD Person schema markup so Google recognises me as a person. A sitemap was submitted via Google Search Console. Images are optimised for fast load times. And the website is fully mobile-friendly, which Google rewards.
Content SEO
Regular blogging signals to Google that the site is active. Pages reference each other through internal linking for better crawlability. And relevant keywords are naturally integrated in titles and text.
The LinkedIn challenge
An interesting problem: when you google “Nick Zomer”, LinkedIn appears at the top instead of my own website. LinkedIn has enormous domain authority that’s difficult to beat. My strategy for ranking higher: consistently publishing content, building backlinks and having my LinkedIn profile link to nickzomer.com.
Lessons I learned
1. Start simple
My first version was far too ambitious. I wanted everything at once: animations, dark mode, CMS integration, the works. Eventually, I learned to start with a solid foundation and expand step by step.
2. Consider mobile-first
I worked desktop-first and had to adjust a lot of CSS afterwards for mobile screens. If I were to start over, I’d work mobile-first. It ultimately saves you a lot of time and frustration.
3. Content is king
The most beautiful website in the world is useless without good content. Invest time in writing strong copy and putting together a good portfolio.
4. SEO starts on day one
Don’t wait until your website is finished to think about SEO. Build it in from the start: good URL structure, meta tags, fast load times and semantic HTML.
5. Your website is never finished
And that’s okay. A portfolio website is a living project. I regularly add new projects, write blog posts and improve the design.
What’s next?
The website is live and I’m proud of the result, but there’s still plenty on the roadmap: more blog content about web development, my studies and entrepreneurship. Expanding the portfolio with case studies for each new project. Continuous performance optimisation. And building a client portal where Zomer Development clients can track their projects.
Final thoughts
Building your own portfolio website is one of the best investments you can make as a developer. It forces you to bring all your skills together: design, development, copywriting, SEO and project management.
My advice? Start today. It doesn’t have to be perfect — it has to exist. You can always improve. My first version was far from perfect, but each iteration brought me closer to what it is now.
Want a professional website too? Feel free to reach out via zomerdev.com or check out my portfolio at nickzomer.com.